


You’ve removed the background from an AI-generated character, logo or product. It looks perfect on a white canvas. Then you place it over a dark website banner and a pale outline appears around the hair, shoulders or object. That white edge is usually background-color contamination in partially transparent edge pixels, not proof that the entire image has an opaque background.
This guide helps you diagnose the problem, clean the edge without destroying fine detail, and export a genuinely transparent image. The methods apply to AI-generated cutouts, but they also work on photographed subjects.
Our result: In a separate controlled test, we deliberately introduced white contamination into a transparent image’s edge colors, then removed it without changing the alpha channel. The correction made a clear difference on a dark background. This verifies the mechanism in a known test case; it is not a claim that we ran Photoshop or fixed an automatically generated halo.
Real test: removing the white background from AI-generated headphones
For a more useful technical example than a cartoon character, we created a pair of matte-black headphones with purple accents on a solid white background using Nano Banana 2 Lite. We then removed that background using Runway’s segmentation tool. Both images below are original outputs from our November 7, 2026 test—not stock images or painted mock-ups.


What this test confirms: We ran the image-generation and background-removal steps and obtained a cutout file. The source and result are available above. What it does not establish: We did not measure the halo intensity pixel by pixel or run Photoshop’s Remove White Matte or Defringe on this cutout. We therefore cannot label the right image a demonstrated halo repair. The featured image on this article is an editorial illustration, not another test result.
Exact image-generation prompt and test settings
Model: Nano Banana 2 Lite (1:1 ratio), one attempt, four Runway credits. Background removal: Runway segmentation, one attempt, one credit. Total: five credits.
Exact generation prompt: “Photorealistic product photography, a single pair of premium deep-black matte over-ear headphones with subtle vivid violet metal accent ring on the earcups and a black fabric headband, shown in three-quarter view with a thin black audio cable extending in a gentle arc next to it, completely isolated against a uniformly pure solid white (#FFFFFF) studio background, full object and cable within frame, no cast shadow or reflections behind object, no other objects, no text, no graphics, clear intricate physical edge detail and cable silhouette, crisp realistic optics. This is a source image for a cutout transparency experiment, not a collage.”
Background-removal target: “the black over-ear headphones with purple accents and their thin black audio cable.” The two website images are optimized WebP versions of the actual image outputs.
Controlled test: can white edge contamination be removed?
Yes, in our deliberately controlled sample. To test the color mechanism directly, we used a separate original transparent headphone image generated in ChatGPT. The source had a genuine alpha channel. We resized it to 960 × 909 pixels and created a new copy with simulated white-matte contamination at partially transparent edge pixels. Then we mathematically removed that known white matte without changing the transparency mask or the shape of the headphones.
Importantly, this is a reproducible reconstruction of a common defect, not proof that our Runway cutout above had the same issue or that Photoshop repaired it. We deliberately introduced the defect so that we could compare against the unchanged clean source.
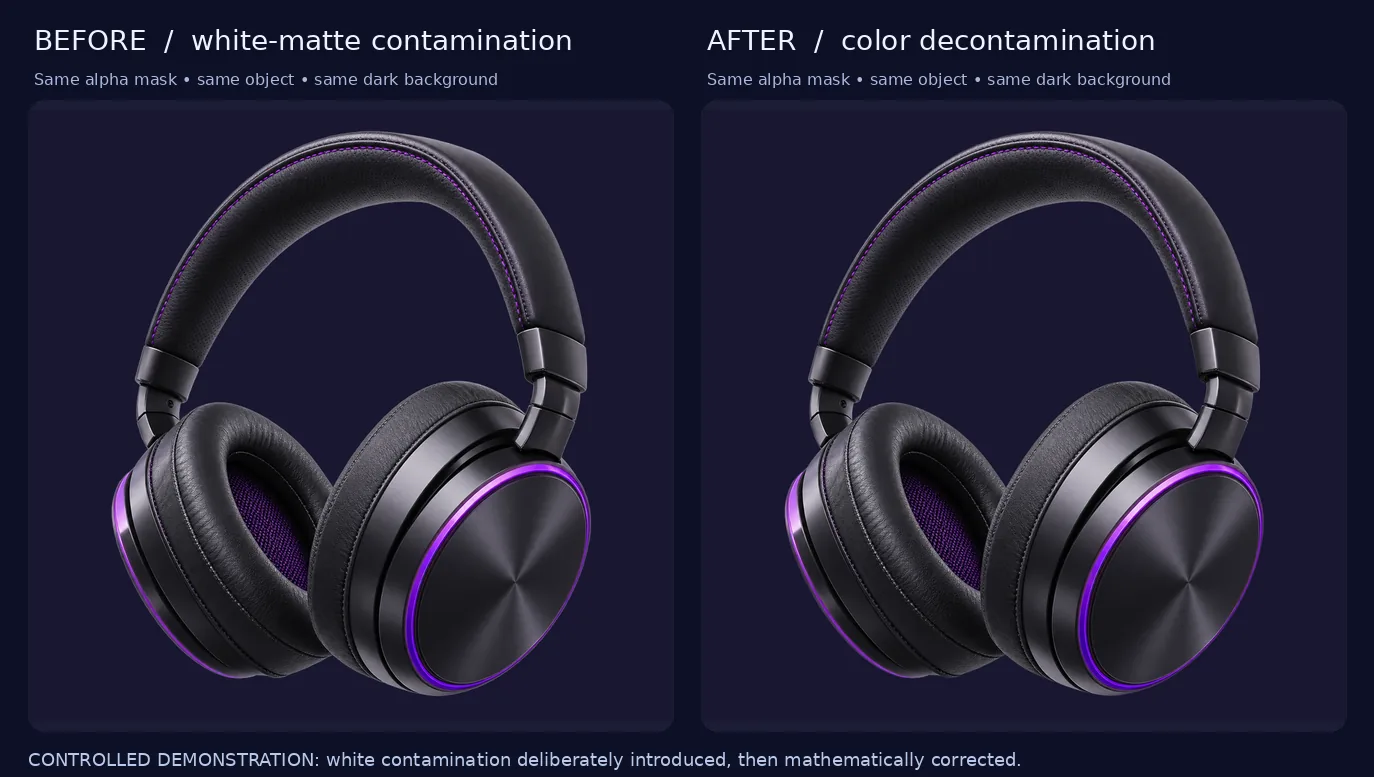
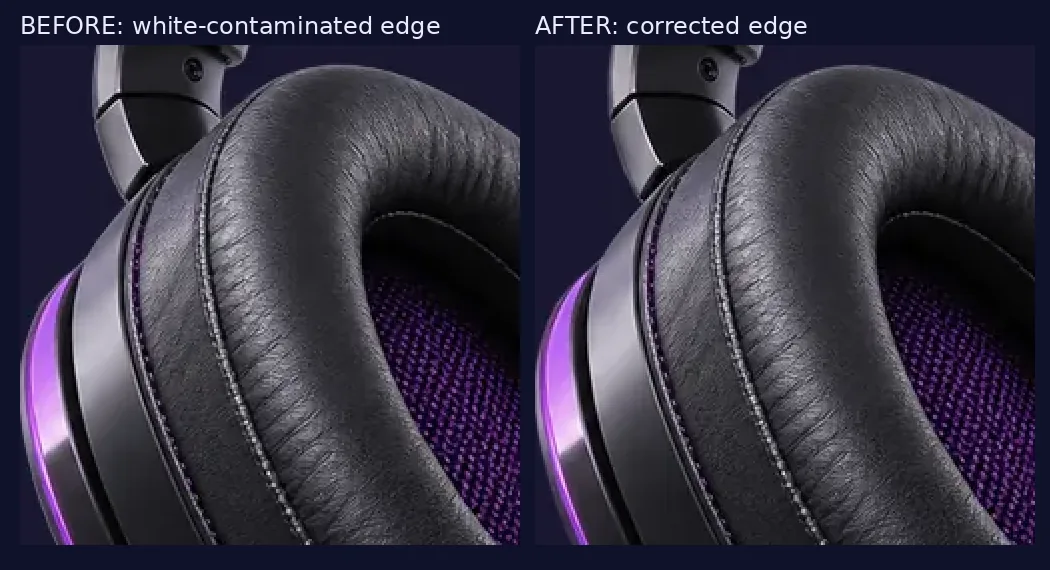
What We Observed
| Check | Measured result |
|---|---|
| Before correction | Brighter, visibly pale anti-aliased edges on dark purple |
| After correction | Edge lightening was greatly reduced; same alpha mask and object geometry |
| Mean RGB error in semi-transparent edge pixels, against the untouched clean source | 25.54 / 255 before → 0.16 / 255 after |
| Scope | One controlled sample, one correction pass; not a Photoshop test or a measured real-world success rate |
The improvement is expected here because we knew the exact white matte we had introduced and reversed its color formula. Real cutouts may contain complex mixed colors, poor masks or missing details; in those cases, the same calculation may not work cleanly.
How we made the comparison
- Generated a black-and-purple headphone asset with a real transparent background using ChatGPT image generation. The exact image model name and credit cost were not available to record.
- Resized the transparent source to 960 × 909 pixels and kept its original alpha values.
- For partially transparent pixels (alpha values 4 through 251 out of 255), created the white-contaminated color using
contaminated RGB = alpha × original RGB + (1 − alpha) × white. The original alpha values were not changed. - Corrected that known contamination by reversing the color blend:
corrected RGB = (contaminated RGB − (1 − alpha) × white) ÷ alpha, with a low-alpha safety limit and output RGB values clamped to 0–255. - Rendered both results on exactly the same RGB(25, 23, 49) dark background, compared the same semi-transparent edge pixels against the untouched transparent source, and exported optimized WebP evidence.
Check the source files: original clean transparent WebP, white-contaminated transparent WebP and corrected transparent WebP. All three preserve transparency and can be placed over any background in an image editor.



What readers should do with a real problem: Confirm that the edge is genuinely light-colored contamination, then try Adobe’s Remove White Matte on a duplicate layer. If it does not fix the fringe, try a small Defringe width or refine the mask. The practical steps are explained next, with links to Adobe’s instructions. We did not run those Photoshop commands ourselves.
First, check what kind of edge problem you actually have
Put your image on three backgrounds: solid white, charcoal gray and a saturated color such as purple. Zoom to 200–300% and inspect hair, fabric and curved outlines.
| What you see | Likely issue | Try first |
|---|---|---|
| Thin white glow on dark background | Light-colored pixels from the original background remain in the semi-transparent edge | White matte removal, defringe or edge color cleanup |
| Rough, staircase-shaped edges | Mask or selection was too hard, or the image was enlarged | Refine the mask gently; reduce unnecessary upscaling |
| Chunks of white between hair strands | Background removal missed interior gaps | Rework those mask regions manually |
| White rectangle behind everything | The export may be opaque, or transparency was flattened | Check alpha channel and export settings |
The distinction matters: defringe is not a substitute for creating a transparent mask. If the image is still a flat JPG, you first need to remove or mask its background.
Why the white halo happens
Transparent image formats such as PNG and WebP can store an alpha value for each pixel. Fully opaque pixels cover the background; fully transparent ones reveal it. Partially transparent pixels make edges look smooth. But their RGB color may still include the old white background. When composited onto black or purple, those pale edge colors become visible.
Adobe describes the same issue in its explanation of fringe pixels around a selection. It identifies anti-aliasing and remnants of the original background as common causes.
Method 1: Remove White Matte in Photoshop
If your subject was separated from a white or very pale background, this is a focused first attempt.
- Open your layered file in Photoshop and keep the original layer untouched.
- Duplicate the cutout layer so you can compare the original and corrected versions.
- Select the duplicate layer containing the subject and its transparency.
- Choose Layer → Matting → Remove White Matte.
- Inspect the image against both dark and light solid backgrounds.
Adobe documents Remove White Matte and Remove Black Matte for anti-aliased selections with remnants of a light or dark original backdrop. Use the matching command only when the fringe corresponds to that matte color. Official Photoshop procedure.
Method 2: Apply a small Defringe correction
For a narrow halo that survives matte removal, Photoshop offers a separate command:
- Select the duplicate cutout layer.
- Choose Layer → Matting → Defringe.
- Start with a small Width such as 1 pixel as an illustrative starting point, not a universal correct setting.
- Inspect fine details at native resolution. Increase the width only if the result clearly improves.
- Undo if hair becomes thinner or the silhouette starts losing detail.
Adobe’s Defringe instructions confirm the menu path and explain that the width controls how many edge pixels are replaced. The ideal value depends on the file’s resolution and the actual fringe.
Method 3: Fix the mask, not the colors
Defringe cannot solve every problem. If you see obvious white patches in the gaps between strands of hair, the mask needs more precise work.
- Keep the original image available on a layer beneath the cutout.
- Select the layer mask, not the subject’s color pixels.
- Inspect the troublesome area at 200% on a contrasting temporary background.
- Paint carefully with black on the mask to hide remaining background, or white to restore missing subject pixels. Use a soft brush where an edge is naturally soft.
- For fine hair, use a dedicated edge-refinement workflow rather than tracing every strand with a hard brush.
Mask corrections are reversible: you are changing what is visible, not erasing source pixels. If you accidentally remove parts of the subject, paint them back into the mask. Avoid a large uniform blur—softening every edge may replace a halo with a visibly fuzzy outline.
Method 4: Prevent contaminated edges during generation
When you control the image-generation stage, prevention is often easier than repair. Request a clean, high-contrast silhouette, avoid pale backgrounds directly adjacent to pale subjects, and leave enough space around the object so it is not cropped before background removal.
If your image generator supports true transparent-background output, verify it by placing the result over a dark color—do not trust a checkerboard drawn into the image itself. If the tool only produces an opaque backdrop, use a dedicated background-removal or masking step afterward.
“Single premium over-ear headphone product in three-quarter view, complete earcups and headband visible, thin cable separated from the body, clean silhouette, evenly lit on a solid contrasting background, no labels, no other objects, no cast shadow, plenty of space around the product.”
Note that this prompt does not guarantee transparent pixels. It is meant to make subsequent masking easier when true transparency is unavailable.
Export without losing transparency
- Hide any solid-color test backgrounds.
- Confirm that transparent areas show the editor’s checkerboard and are not simply painted white.
- Export as PNG or WebP with alpha transparency, depending on your publishing workflow. JPG does not preserve transparency.
- Reopen the exported file over a dark test background.
- Check the edge at actual intended display size. A result that looks fine at 200% can still look too sharp or too soft in a small website card.
For AI Revolution, we prepare final images for WordPress as optimized WebP. That is an editorial publishing requirement, not an assertion that WebP automatically removes halos. The alpha channel and edge colors still have to be correct before conversion.
A repeatable quality-control test
| Checkpoint | Pass condition |
|---|---|
| Dark background | No obvious pale outline at normal viewing size |
| Light background | No dark, muddy fringe around the same edge |
| Hair or fur | Fine strands remain believable rather than clipped or blurry |
| Accessories | Small straps, cables or jewelry were not accidentally removed |
| Exported file | Actual transparency is preserved, not an embedded checkerboard |
Do not judge a repair by a single preview against white. The point of a transparent cutout is that it must work on different backgrounds.
Bottom line
A white outline is usually an edge-color or masking problem, not a reason to regenerate the entire image. In our deliberately white-contaminated test, correcting the edge RGB values greatly reduced the visible halo without changing transparency. That outcome does not guarantee an equally good result on an arbitrary cutout: actual masks, matte colors and missing fine details vary. Inspect your image on contrasting backgrounds, try the appropriate matte command or a modest Defringe adjustment, and preserve an unedited copy for comparison.
For another common AI image problem, see our three real ChatGPT image-editing tests and fixes.
Verified references: Adobe’s fringe pixel explanation, Remove White/Black Matte, and Defringe. The Nano Banana 2 Lite / Runway before-and-after background-removal files are our own actual generated results. The separate white-halo before/after is a controlled color experiment using an intentionally introduced defect, and is not presented as an observed Runway failure or a Photoshop outcome. Adobe’s Remove White Matte and Defringe commands are documented procedures, not software that we operated in this test.