

Your AI image looks sharp, colorful, and technically impressive—but something still feels fake. Maybe the face is too smooth, the room looks like a showroom, or the lighting seems to come from everywhere at once. The fix is rarely another “ultra-realistic, 8K masterpiece” prompt. You need to make the scene behave like a photograph.
Quick answer: Describe one believable light source, a specific camera viewpoint, ordinary materials, and natural imperfections. Generate a version, inspect it at 100% zoom, and repair only the details that break realism. Below are copyable prompts and a repeatable inspection workflow.
Why AI images look fake
The most obvious clues are often inconsistencies rather than a lack of detail. A face may have flawless skin while the hands look malformed. A lamp casts a shadow to the left while the window suggests light from the opposite direction. Fabric looks painted instead of woven. These conflicts matter more than adding extra sharpness.
- Plastic skin: no pores, freckles, fine lines, or variation in texture.
- Impossible lighting: bright edges and shadows with no plausible source.
- Over-staged composition: perfect symmetry, identical objects, and spotless environments.
- Wrong physical details: strange fingers, floating objects, bent furniture, or inconsistent reflections.
- Artificial processing: extreme sharpening, aggressive HDR, or uniformly blurred backgrounds.
Visual example: plastic versus natural-looking skin
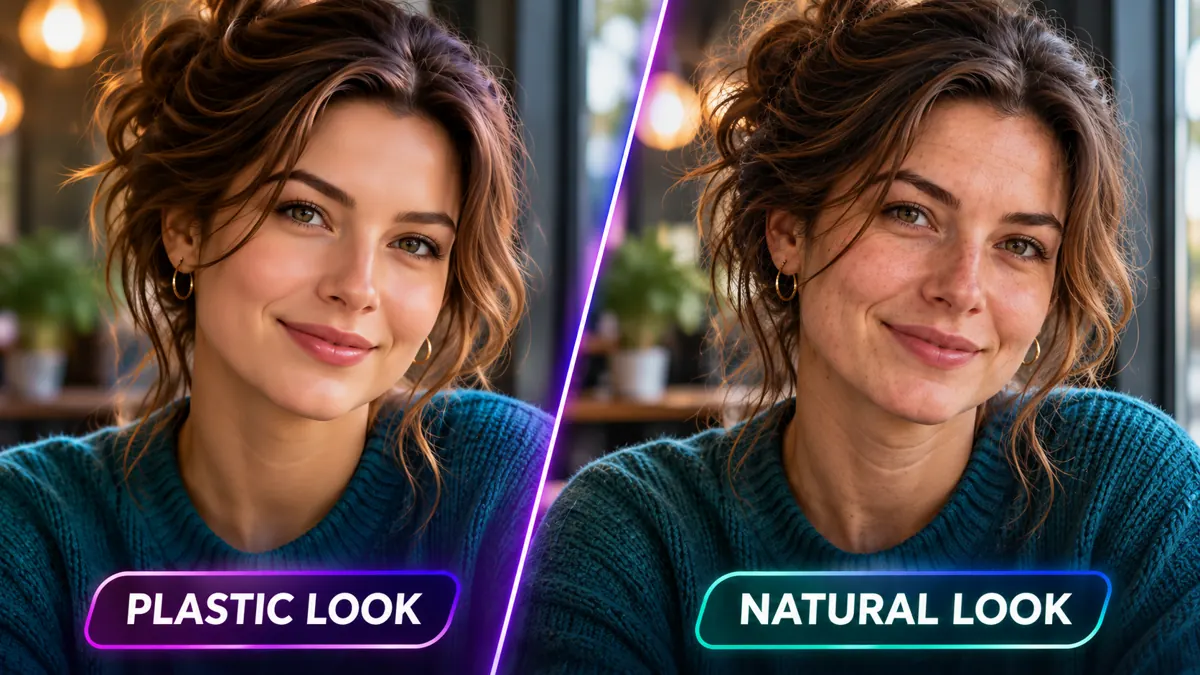
Notice the differences in skin texture, small facial variations, and overall polish. These are visual cues to look for—not proof that any particular prompt will produce the same improvement in every model.
Inspect portraits, rooms and products
Different scenes fail in different ways. Use these checks before changing a prompt:
- Portrait: inspect cheeks and forehead at full size, then check facial structure, eyes and light direction.
- Interior: trace window light across furniture and floors; look for plausible shadows and straight architectural lines.
- Product: check the mug rim, glaze, handle geometry and the shadow where it meets the table.
Step 1: Start with a photographic brief, not a pile of adjectives
Build your prompt in this order: subject → setting → light source → camera viewpoint → materials and texture → constraints. Keep each part compatible with the others. A candid café portrait and a dramatic studio beauty campaign require different lighting and styling.
Weak prompt
A perfect beautiful woman, ultra realistic, cinematic, 8K, flawless skin, masterpiece, amazing lighting.
More useful prompt
A candid waist-up photograph of a woman in her early 30s sitting at a neighborhood café. Soft overcast daylight enters through a window on camera right. Natural skin texture, faint freckles, a few loose hair strands, and relaxed posture. The look of a 50mm full-frame lens with a gently out-of-focus background. Muted realistic colors, ordinary café furniture, no beauty retouching, no text or logos.
The second version tells the generator what the camera is supposed to see. It also avoids conflicting instructions such as “flawless skin” and “natural imperfections.” A lens description helps set the visual style, but it does not guarantee that the model will reproduce real optical behavior.
Step 2: Give the scene one believable light source
Instead of asking for “perfect cinematic lighting,” specify where light comes from and how it affects the subject. For example: “soft daylight from the left window, a gentle shadow on the right side of the face, and subtle reflections on the mug.” If the setting is outdoors, describe overcast sky, late afternoon sun, or a streetlamp. Then inspect whether shadows and reflections agree.
Keep the scene and person unchanged. Make the lighting feel like soft daylight coming from the window on the left. Match facial shadows, fabric highlights, and the shadow under the coffee cup to that source. Avoid glowing outlines and exaggerated contrast.
This is an editing instruction to try on an existing image. It is not a claim that the editor will preserve every pixel outside the requested area.
Step 3: Replace plastic skin with plausible texture
A realistic portrait does not require exaggerated pores. Look for restrained variation: subtle under-eye shadows, fine skin texture, a few flyaway hairs, and small differences between the two sides of the face. Avoid forcing freckles or wrinkles onto a subject when they do not fit the person.
Preserve the person's identity, expression, hairstyle, and composition. Reduce the overly smooth beauty-filter effect. Restore subtle, believable skin texture and natural tonal variation without exaggerating pores, adding wrinkles, or changing facial features. Keep the original light direction.
Check the eyes, nose, mouth, and face shape after editing. If the person looks different, revert and make a narrower request. ChatGPT Images supports uploaded-image edits and area selection, but OpenAI cautions that selections are not always precise and edits may extend beyond the selected region. See the official ChatGPT Images editing guide.
Step 4: Make materials and contact points believable
Realistic images depend on how objects behave. Ceramic reflects light differently from matte fabric. A cup should sit on a table, not hover. Fingers should wrap around an object without passing through it. A window reflection should correspond to something in the room.
- Fabric: ask for visible weave, natural folds, and seams that connect correctly.
- Glass and ceramics: check reflections, transparency, rims, and contact shadows.
- Furniture: check perspective, legs, straight edges, and floor contact.
- Hands: check thumb position, visible fingers, and how the hand grips objects.
- Text and logos: inspect letter by letter, or omit nonessential lettering.
If the main issue is a hand, use our guide to fixing deformed hands in AI images. If editing changes the entire composition, see why ChatGPT sometimes changes the whole image.
Step 5: Edit the weakest detail instead of regenerating everything
- Save the original image before making changes.
- Inspect the face, hands, objects, background, and lighting at full size.
- Choose the single most distracting problem.
- Select the affected area if the editor supports selection; include enough context for a natural transition.
- Use a specific repair instruction, then compare the entire edited image against the original.
- If identity, composition, or lighting drift, revert and narrow the edit—or regenerate when the scene is fundamentally broken.
Repeated edits can accumulate unwanted changes. Keep an untouched original and compare versions side by side rather than trusting memory.
Three copyable prompts for different scenes
Realistic portrait
An unstaged portrait of a middle-aged man reading at a kitchen table on a cloudy morning. Soft daylight from the window, relaxed posture, natural facial texture, ordinary clothing with realistic fabric folds, slightly imperfect background details, documentary photography feel, no beauty retouching, no text.
Realistic apartment interior
A believable photograph of a small lived-in apartment living room. Warm beige walls, oak table, linen curtains with uneven folds, natural afternoon light from one window, accurate room proportions, straight architectural lines, subtle wood grain, a few everyday objects, no glossy showroom lighting, no text.
Realistic product scene
A clean editorial product photograph of a plain matte ceramic mug on a wooden desk. Soft window light from the right, subtle glaze variation, realistic contact shadow, natural wood texture, restrained highlights, camera at desk height, no logo, no invented lettering, no extra objects.
These are illustrative prompt templates, not a benchmark. Change the subject, camera angle, and light source to match your actual scene. Results depend on the model and the input.
A 60-second realism checklist
- Can you identify where the main light comes from?
- Do skin, fabric, glass, and wood have plausible textures?
- Are fingers, teeth, eyes, and object edges anatomically and physically coherent?
- Do reflections and contact shadows make sense?
- Does the scene look naturally composed rather than perfectly staged?
- At 100% zoom, are there broken letters, repeated patterns, or fused objects?
- Did the edit preserve the details you wanted to keep?
What usually does not help
Adding “8K” to every prompt: a resolution adjective rarely fixes bad anatomy or inconsistent light. Adding heavy film grain: grain can mask smoothness, but it cannot repair geometry. Overloading negative prompts: long lists of prohibitions can distract from the main instruction or conflict with the scene. Start with a few specific exclusions that matter most. Sharpening everything: real photographs have focus falloff; uniformly crisp backgrounds often feel artificial.
Visual example: smooth AI skin versus natural-looking texture
Compare the cheeks, forehead and areas around the eyes. The left portrait illustrates overly uniform, smoothed skin. The right illustrates a more varied surface with visible pores, fine lines, subtle redness and small pigment spots. Both are conceptual AI-generated examples created together, not a documented edit of one original image.
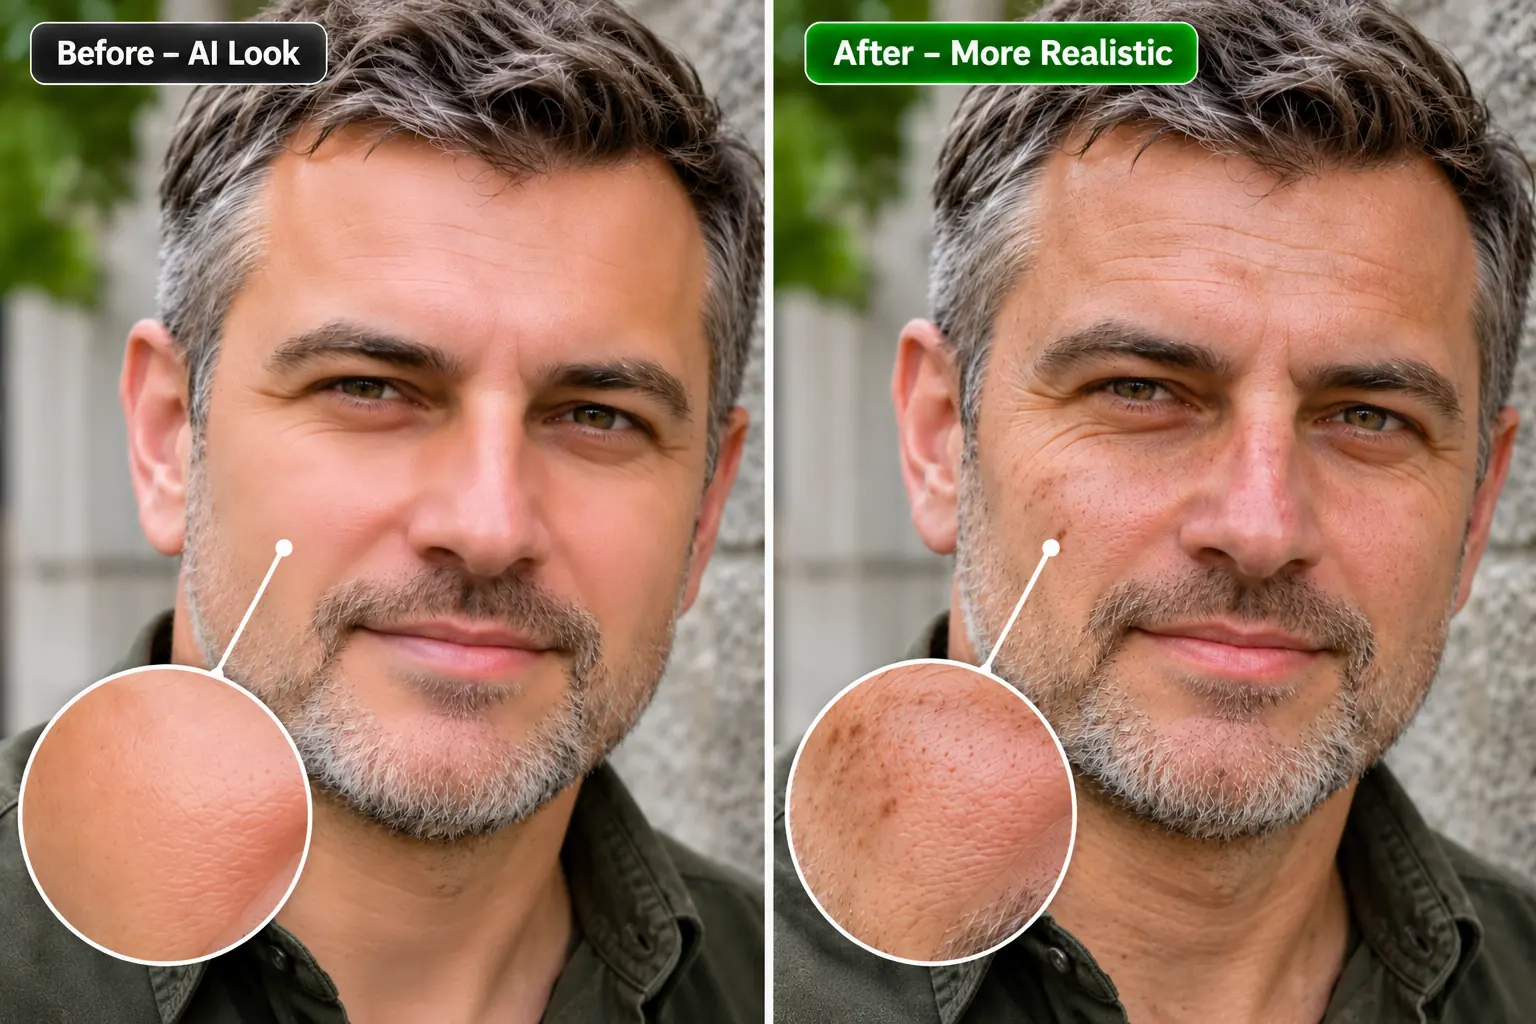
Prompt to try on your own original: “Keep the same person, facial features, expression, hairstyle, clothing, background, camera angle and lighting. Change only the facial skin texture: reduce the airbrushed appearance and add subtle pores, natural tonal variation, a few small pigment spots, gentle redness and fine lines appropriate to the person’s age. Do not exaggerate blemishes or change identity or composition.”
How to evaluate your result: save the original, edit the actual uploaded image, and compare both at the same zoom. Check not only whether skin looks more natural, but also whether eyes, facial shape, beard, clothing or background changed unintentionally. An edit prompt is an instruction, not a guarantee.
When to edit—and when to regenerate
Edit a localized problem when the composition already works: overly smooth skin, a minor material flaw, an isolated hand error, or a small unwanted object. Keep an untouched original and check the entire result after each attempt.
Regenerate the scene when perspective is broken throughout the image, multiple shadows contradict the lighting setup, or local edits repeatedly change the subject’s identity. For example, if daylight enters from the left but the main shadows also fall toward the left without another plausible light source, inspect the whole lighting setup rather than just increasing detail.
Quick questions about realistic AI images
Why do AI portraits sometimes look fake?
Over-smoothed skin, implausible highlights, mismatched facial details, and inconsistent light can make an otherwise sharp portrait feel artificial. Check those before adding more texture.
Does adding “8K” make an AI image more realistic?
Not reliably. Resolution-related wording cannot be counted on to fix incorrect anatomy, material behavior, or lighting. Describe what should actually appear in the scene.
Are negative prompts useful?
Sometimes, depending on the generator. Prefer a short list of relevant exclusions, such as no logos or no heavy beauty retouching, and test whether the model follows them.
What we tested—and what we did not
The portrait comparisons on this page are conceptual AI-generated illustrations, not controlled sequences of edits to the same source image. The prompt examples are usable starting points, but AI Revolution has not measured their success rate or compared them across generators for this article. To evaluate a technique fairly, keep the model, input scene, and settings fixed while changing one instruction at a time, and save every output—including failures.
Bottom line
Photographic realism comes from consistency: plausible lighting, believable materials, natural texture, and correct anatomy. Start with a clear photographic brief, repair the most distracting flaw, and check the whole image after each edit. A believable ordinary moment will often work better than an impossibly perfect one.